# Trae on Codex Pooler
Trae combines an AI code editor with agent chat to help you understand and change a project. Add Codex Pooler as a custom model connection to use models available to your Pool. This guide covers the model settings for both Trae and Trae CN.
## Before you start
- Install [Trae](https://www.trae.ai/download) or your regional Trae CN edition and sign in.
- Have a Codex Pooler URL reachable from the client.
- Create a [Pool API key](/getting-started/quick-start/) and choose a model available to that Pool.
## Configure the connection
Use the commands for the terminal that starts the client. Environment-variable assignments below apply to that terminal; desktop apps and services need the variables in their own launch environment.
### Runtime shape
Use a Pool API key for model requests. Do not reuse operator MCP tokens,
browser sessions, upstream account tokens, or imported account material.
```text
Custom Request URL:
https://codex-pooler.example.com/v1
Full URL:
off
```
Trae appends `/chat/completions` when **Full URL** is off. Do not end the custom
request URL with a slash.
For local setup, use `http://localhost:4000/v1`.
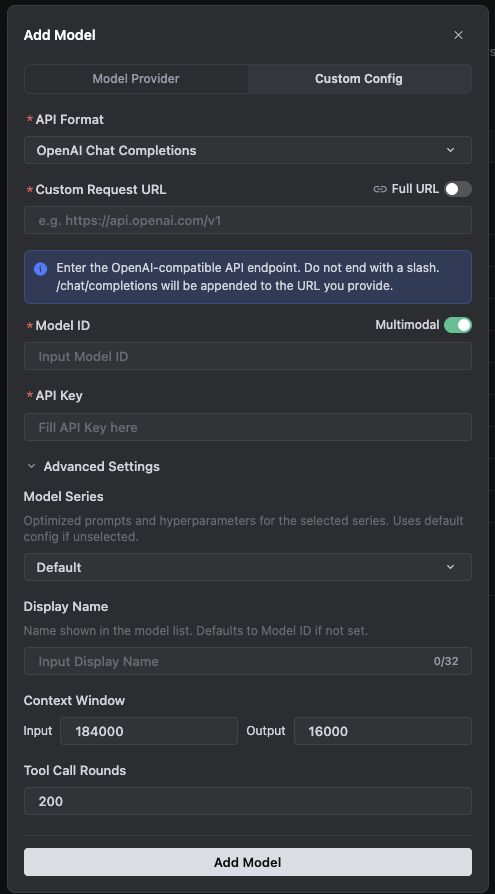
### Custom model settings
In Trae, open **Settings -> Models**, add a custom model, and use the custom
configuration path.
| Field | Value |
| --- | --- |
| API format | OpenAI Chat Completions |
| Custom Request URL | `https://codex-pooler.example.com/v1` |
| Full URL | Off |
| Model ID | `gpt-6-sol` or another model id served by the assigned Pool |
| Multimodal | On when the Pool model supports image input |
| API key | Pool API key |
| Model Series | Default |
| Display Name | `GPT-6 Sol via Codex Pooler` |
| Context Window input | `184000` |
| Context Window output | `16000` |
| Tool Call Rounds | `200` |
If you enable **Full URL** instead, the value must become
`https://codex-pooler.example.com/v1/chat/completions`. Keep it off for the
normal setup shown above.
### Trae CN labels
In Trae CN, the same flow appears as **设置 -> 模型** and **自定义配置**. The
field values are the same:
| Field | Value |
| --- | --- |
| API 格式 | OpenAI Chat Completions |
| 自定义请求地址 | `https://codex-pooler.example.com/v1` |
| 完整 URL | Off |
| 模型 ID | `gpt-6-sol` or another model id served by the assigned Pool |
| API 密钥 | Pool API key |
| 模型系列 | Default |
| 显示名称 | `GPT-6 Sol via Codex Pooler` |
| 上下文窗口 input | `184000` |
| 上下文窗口 output | `16000` |
| Tool Call Rounds | `200` |
With 完整 URL off, Trae appends `/chat/completions` to the request URL. If you
turn 完整 URL on, use the full
`https://codex-pooler.example.com/v1/chat/completions` endpoint instead.
For Trae Work, custom model availability is limited to the desktop/local
environment in the current public docs. Keep this configuration on the client
surface that can actually save and validate custom models.
## Choose a model
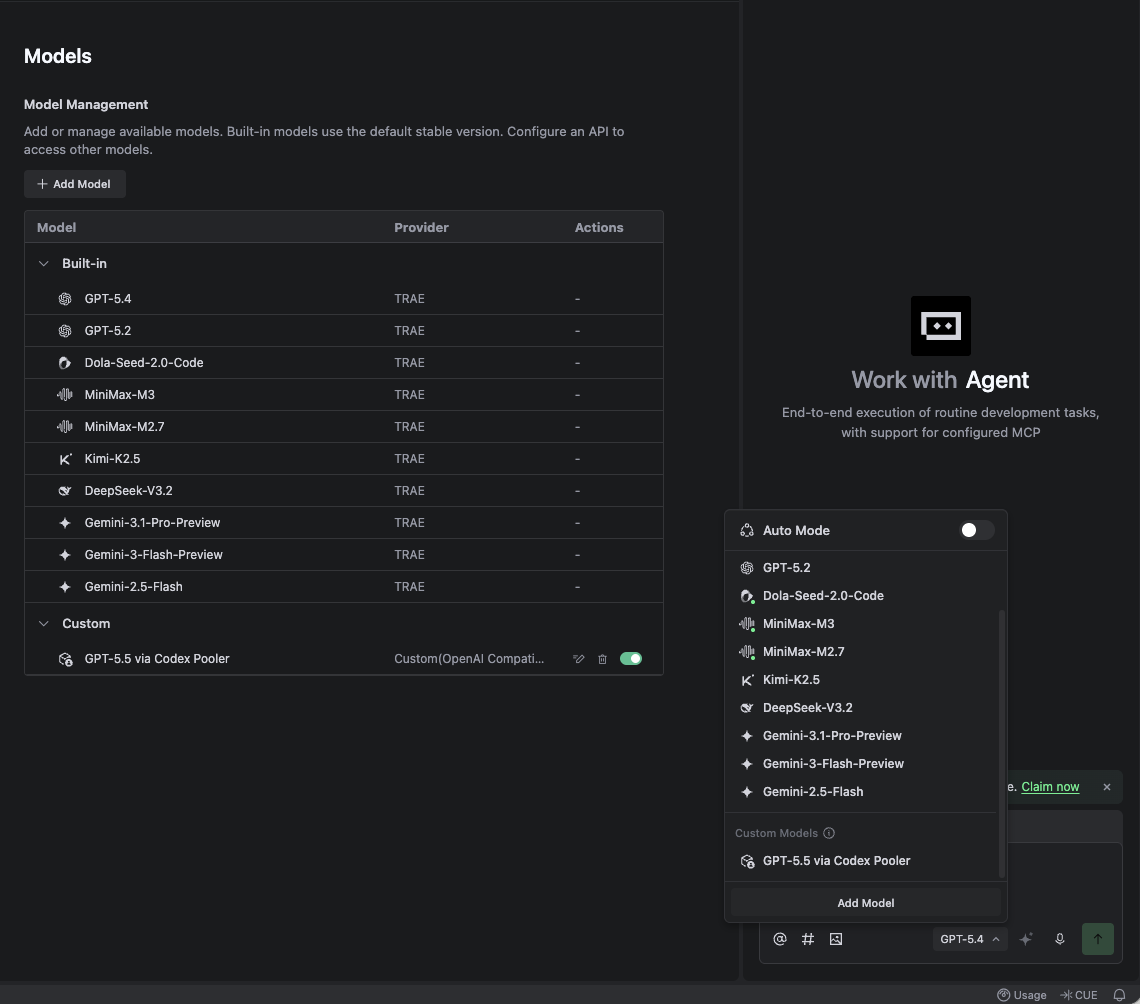
After saving the custom model, open the agent model picker and turn **Auto
Mode** off. The model list is hidden behind Auto Mode by default. Select the
custom Codex Pooler model under **Custom Models**.
## Verify the connection
First check the Pool API key and model with a direct chat-completions request:
**macOS / Linux / WSL**
```bash
curl -sS -X POST \
-H "Authorization: Bearer $CODEX_POOLER_API_KEY" \
-H "Content-Type: application/json" \
--data '{
"model": "gpt-6-sol",
"messages": [
{ "role": "user", "content": "Reply with exactly: trae ok" }
],
"stream": false,
"max_completion_tokens": 16
}' \
https://codex-pooler.example.com/v1/chat/completions
```
**Windows PowerShell**
```powershell
$headers = @{ Authorization = "Bearer $env:CODEX_POOLER_API_KEY" }
$body = @{
model = "gpt-6-sol"
messages = @(@{ role = "user"; content = "Reply with exactly: trae ok" })
stream = $false
max_completion_tokens = 16
} | ConvertTo-Json -Depth 5
Invoke-RestMethod -Method Post -Uri "https://codex-pooler.example.com/v1/chat/completions" -Headers $headers -ContentType "application/json" -Body $body
```
For local setup, change the URL to
`http://localhost:4000/v1/chat/completions`.
Then save the custom model in Trae or Trae CN. Treat the setup as working only
when the model add/check step succeeds and a real chat can answer `trae ok`
through the configured model.
In Codex Pooler's request logs, match the request time, API key, model, and final status to your test. A reply alone does not confirm that the client used your Pooler instance.
## Compatibility notes
Trae should point at Codex Pooler's `/v1` base URL with **Full URL** off, or at
`/v1/chat/completions` only when **Full URL** is on. Do not point Trae at
`/backend-api/codex`, `/v1/responses`, `/mcp`, or a Codex Pooler admin URL.
Codex Pooler model use does not require MCP. If you need operator metadata, use
a separate MCP-capable host with an operator MCP token.